The steps below explain how to create a CS01 Multiline template. Before proceeding, it is recommended that you know Perform a Simple Upload and you have read over the recording Tips and Tricks.
- Go to the Data page in Data Workbench.
- Click Record a Template.
- In the Recording Options tab, make sure that Batch Input is checked.
- On the Template Information tab, enter the transaction code that you would like to record. The following steps use CS01 as an example.
- In the Template Type field, select BDC Template.
- Give the template a meaningful name, typically a brief description of what actions you are performing during the recording.
- Optionally, add a description. This may be helpful if you have notes to add about the recording or you want to distinguish this recording from other similar recordings.
- Uncheck Create Load File on the Load File Options tab. The load file is created later in the tutorial.
- Click Record Template. The SAP GUI opens with the initial screen for the transaction.
- Fill out the header data, making sure to "touch" all of the fields for the upload.

Figure 1 - CS01 Initial Screen - After filling out all the header data, press <ENTER>.
- Add the first line item to the grid. It is important that it is done a specific way to make a repeatable process for the loop.
- As shown in Figure 2, enter the necessary data for the first line item.
- Press 1-line new item. If any additional screens appear
requesting additional data for the line item fill in any desired fields and press <ENTER> through the
screens until SAP returns to the New Material Items screen.
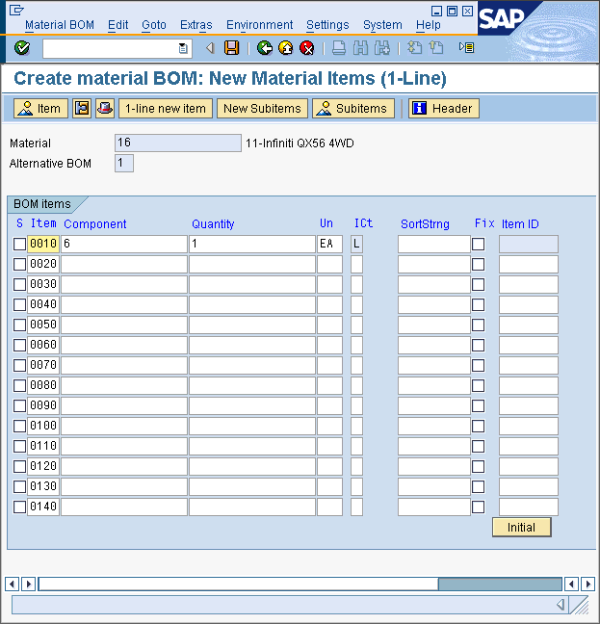
Figure 2 – CS01 First Line Item Entered - Repeat the process for another line item. Notice that after the "1-line new item" button was clicked the second time, the data shifted to the first row and the second row is free for more data.
- Click Save in the SAP GUI or end the transaction however you normally would. The SAP GUI closes and Data Workbench creates the template.
- Click View Templates in the main toolbar to open the Templates page.
- Select the newly created template and click Edit.
- Go to the BDC Contents tab.
- In the template contents, look for a pattern where one or more screens repeat. These repeated screens
represent each line item entered during the recording and contain the same line item
fields in each set of the pattern. Figure 3 below shows the selected screen and the one below it are
almost identical except for the data values. The next steps will be to loop the first instance of the
pattern and delete any other instances.

Figure 3 – Template Editor Incrementing the Loop Level - Select the first instance of the pattern, right click and select Increment Loop Level as shown in Figure 3 to identify that part of the template as repetitive, allowing you to enter a variable number of line items.
- Select all other instances of the pattern
below the loop level that was just created and click Delete Item.
Note: Be careful not to delete the last screen that contains the Save button press. If you make a mistake, you can always go back to the original recorded state by clicking the "Restore Original" button.
Figure 4 – Template Editor Deleting Extra Screens - Select the first screen of the loop, containing field names with the suffix (01) as
shown in Figure 5, and click Properties to open the Edit Item Properties dialog.

Figure 5 – Adding Properties to the Screen - Check Apply naming scripts and enter the number 2 in Number of Items in grid
and Position in grid after page down, as shown in Figure 6.

Figure 6 – Edit Item Properties Dialog - Click OKin the dialog.
- Click Save Changes to return to the Templates page.
- Select the edited template and click Create Load File.
- Select the Create a Single Sheet option.
- Click OK to create an Excel file
that contains a single worksheet containing both the header and the line item columns.

Figure 7 –Create Load File Dialog - To add data to the load file, enter the header information and the detail for the first line item in the first row of the load file.
- Enter the remaining line items for the transaction in the following rows.
- To begin another record, start the next row with the header information and repeat. Data Workbench will keep
adding line items until it detects new data in the header columns. See Figure 8 for an example.

Figure 8 – The CS01 Single Sheet Load File - After populating the data in the load file, and saving it, go to the Upload Data to SAP Page.
- Select the file and click Upload as show in Figure 9 below.

Figure 9 – Upload Data to SAP Page
NOTE: If records fail, see Troubleshoot Error Messages.